인프런 '박용주 지식 공유자님' 의 [Next.js 시작하기] 강의를 수강하고 작성한 게시글입니다.
Next.js 시작하기(feat. 지도 서비스 개발) - 인프런 | 강의
Next.js의 기본을 다루는 강의입니다. Next.js로 지도 서비스를 처음부터 끝까지 개발해봅니다., - 강의 소개 | 인프런...
www.inflearn.com
DetailSection
detailSection 추가하기
▼ myapp/components/home/MapSection.tsx
import styles from '../../styles/detail.module.scss';
import { IoIosArrowUp } from 'react-icons/io';
const DetailSection = () => {
return (
<div className={styles.detailSection}>
<div className={styles.header}>
<button className={styles.arrowButton} disabled>
<IoIosArrowUp size={20} color="#666666" />
</button>
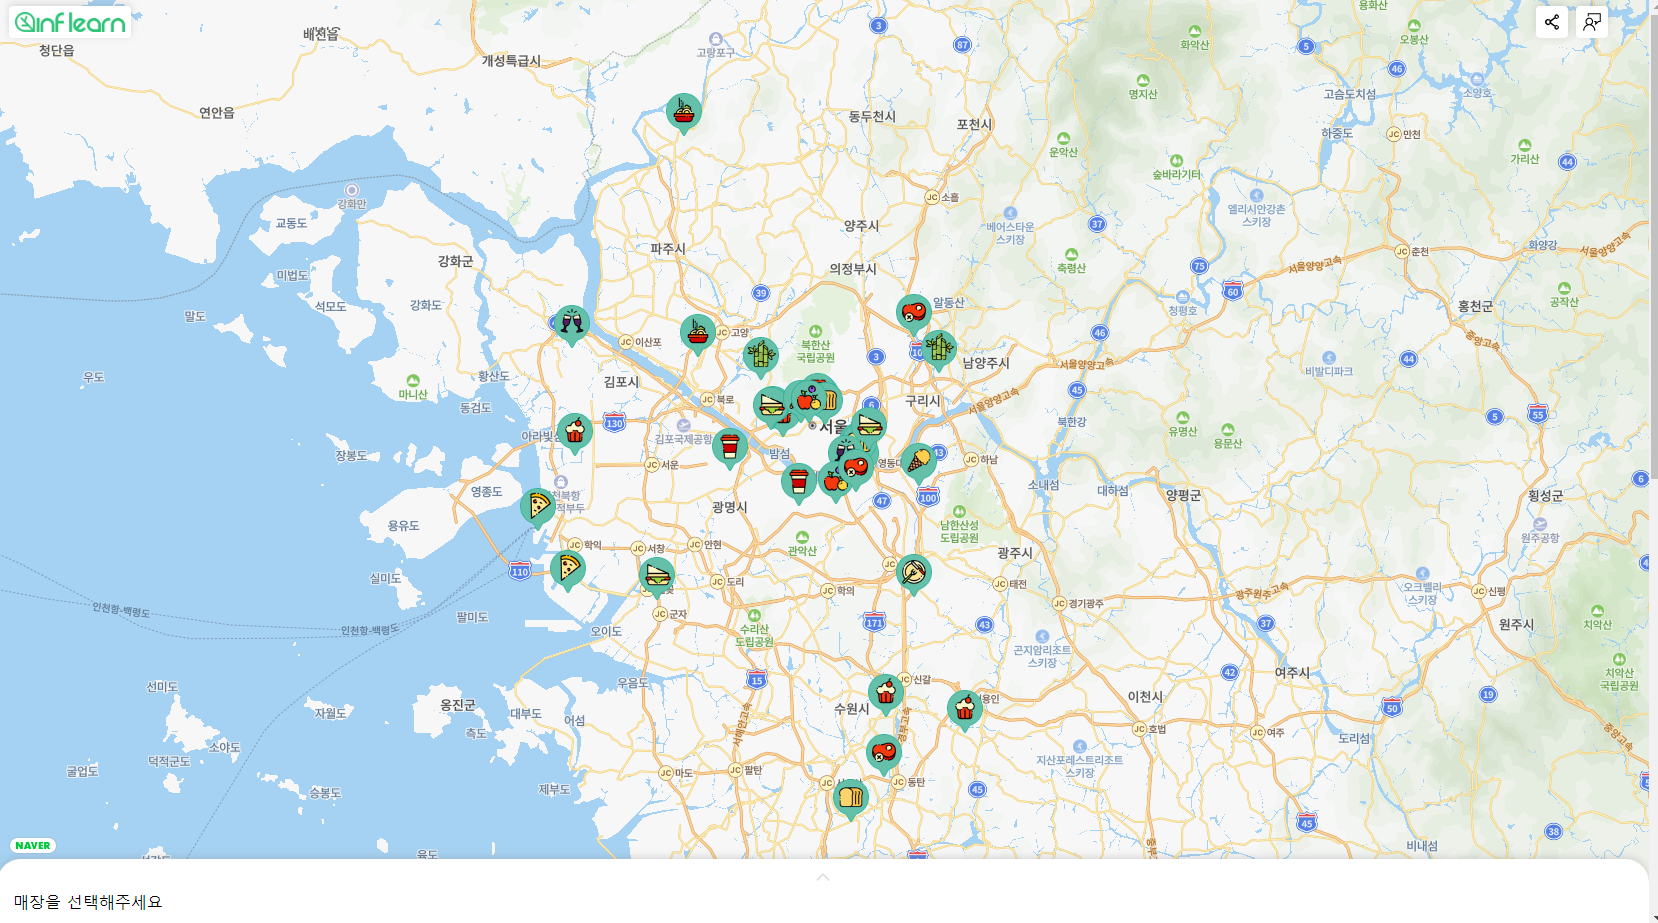
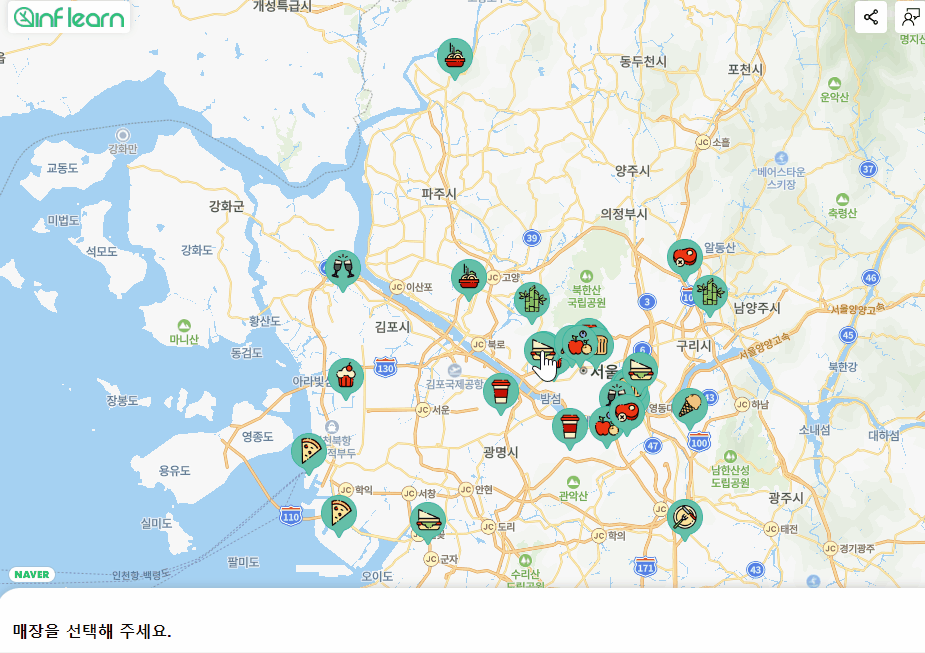
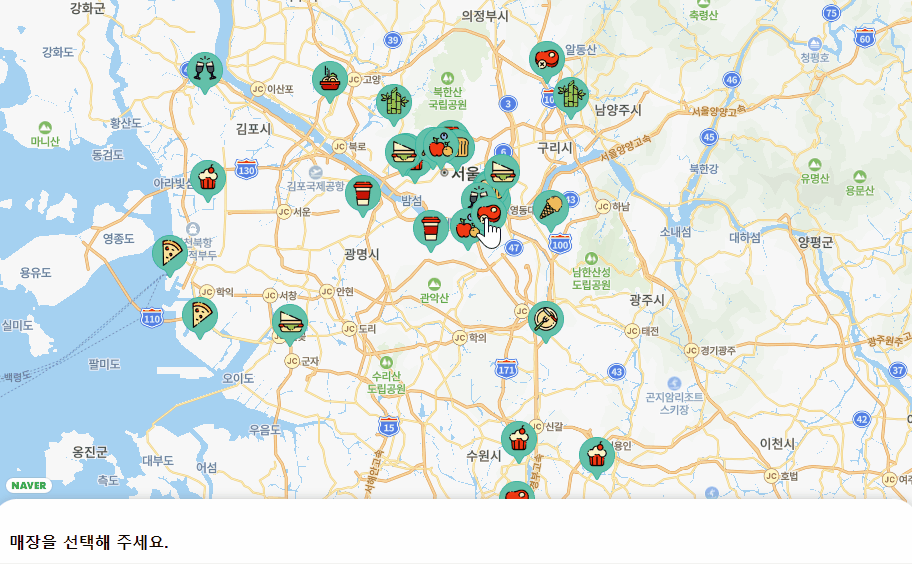
<p className={styles.title}>매장을 선택해주세요</p>
</div>
</div>
);
};
export default DetailSection;▼ myapp.styles/detail.module.scss
- ▽ translateY 로 화면에 하단에 detailSection이 위치하도록 함
$header-height: 60px;
$section-padding-top: 8px;

.detailSection {
    position: absolute;
    left: 0;
    bottom: 0;
    width: 100%;
    height: 100%;
    z-index: 101;

    padding: $section-padding-top 16px 16px;
    background-color: white;
    border-top-left-radius: 24px;
    border-top-right-radius: 24px;
    box-shadow: 0 -2px 8px 0 rgba(136, 136, 136, 0.3);

    transform: translateY(
        calc(100% - #{$header-height} - #{$section-padding-top})
    );
}
.header {
    height: $header-height;

    display: flex;
    flex-direction: column;

    .arrowButton {
        height: 20px;
        align-self: center;

        border: none;
        background-color: transparent;
        &:disabled {
            opacity: 0.2;
            cursor: not-allowed;
        }
    }
}

.title {
    margin: 4px 0;
    font-size: 1rem;
    font-weight: 500;
}
▼ myapp/pages/index.tsx
- ▽ MapSection 추가하고, main에 position 속성 "relative" 추가
    return (
        <Fragment>
            <Header />
            <main
                style={{ position: 'relative', width: '100%', height: '100%' }}
            >
                <MapSection />
                <DetailSection />
            </main>
        </Fragment>
    );
네이버 로고 detailSection 위에 위치하기
▼ myapp/components/home/Map.tsx
- ▽ 네이버 로고에 스타일 적용하기 위해서 styles import
import styles from '../../styles/map.module.scss'; <div id={mapId} className={styles.map} />▼ myapp/styles/map.module.scss
- ▽ 네이버 로고가 map 컴포넌트의 두번째 div이므로 & > div:nth-of-type(2) 에 detailSection의 header-height값과 section-padding-top 값을 더한 것을 bottom 값으로 줌
- ▽ !important 속성을 추가해 강제로 값을 변경함
@use './detail.module.scss';
.map {
    width: 100%;
    height: 100%;

    & > div:nth-of-type(2) {
        bottom: detail.$header-height + detail.$section-padding-top !important;
    }
}
DetailSection 애니메이션 구현하기
매장 선택 시 매장 이름 표시하기
▼ myapp/components/home/MapSection.tsx
const { data: currentStore } = useSWR(CURRENT_STORE_KEY); {!currentStore && (
<p className={styles.title}>매장을 선택해주세요</p>
)}
{currentStore && (
<p className={styles.title}>{currentStore.name}</p>
)}
DetailSection 펼치기 / 접기
▼ myapp/components/home/MapSection.tsx
- ▽ detailSection이 확장되어있는지를 구분하는 state 'expanded' 생성
const [expanded, setExpanded] = useState(false);- ▽ detailSection의 가장 부모 div 태그에 className 추가
- ▷ 현재 선택된 매장이 있으면 styles.selceted를 추가한다.
- ▷ detailSecton이 확장 되어있으면 styles.expanded 를 추가한다.
    <div
      className={`${styles.detailSection} ${
        currentStore ? styles.selected : ''
      } ${expanded ? styles.expanded : ''}`}
>- ▽ 화살표 버튼의 className을 추가한다.
- ▷ detailSecton이 확장 되어있으면 styles.expanded 를 추가한다.
- ▽ 버튼을 클릭했을 때 expanded 값이 true이면 false로, false이면 true로 바꾼다.
- ▽ 현재 선택된 매장이 없으면 클릭이 안되도록 disabled 속성을 설정한다.
        <button
          className={`${styles.arrowButton} ${expanded ? styles.expanded : ''}`}
          onClick={() => setExpanded(!expanded)}
          disabled={!currentStore}
        >
          <IoIosArrowUp size={20} color="#666666" />
        </button>
▼ myapp/styles/detail.module.scss
- ▽ 매장이 선택된 상태면 160px만큼 detailSection이 올라오도록 한다.
- ▽ detailSection이 확장된 상태일 때는 끝까지 올라오도록 한다.
// .detailSection
  transition: transform 800ms;
  transform: translateY(
    calc(100% - #{$header-height} - #{$section-padding-top})
  );
  &.selected {
    transform: translateY(calc(100% - 160px));
  }
  &.expanded {
    transform: translateY(0);
}- ▽ detailSection이 확장된 상태이면 화살표 버튼이 반대로 (접는 모양)으로 바꾼다.
//  .arrowButton
    &.expanded {
      transform: rotate(180deg);
    }
펼치기/접기 버튼에 애니메이션 추가하기
▼ myapp/styles/detail.module.scss
- ▽ 버튼에 bounce 애니메이션을 정의하고 추가하여 위아래로 왔다갔다하도록 한다.
// .arrowButton
  @keyframes bounce {
      from {
        transform: translateY(0);
      }
      to {
        transform: translateY(-3px);
      }
    }
    svg {
      animation: bounce 600ms infinite alternate ease-in;
    }
DetailSection UI 완성하기
reset CSS 코드 추가
▼ myapp/styles/globals.scss
/* http://meyerweb.com/eric/tools/css/reset/
   v2.0 | 20110126
   License: none (public domain)
*/
div,
span,
applet,
object,
iframe,
h1,
h2,
h3,
h4,
h5,
h6,
p,
blockquote,
pre,
a,
abbr,
acronym,
address,
big,
cite,
code,
del,
dfn,
em,
img,
ins,
kbd,
q,
s,
samp,
small,
strike,
strong,
sub,
sup,
tt,
var,
b,
u,
i,
center,
dl,
dt,
dd,
ol,
ul,
li,
fieldset,
form,
label,
legend,
table,
caption,
tbody,
tfoot,
thead,
tr,
th,
td,
article,
aside,
canvas,
details,
embed,
figure,
figcaption,
footer,
header,
hgroup,
menu,
nav,
output,
section,
summary,
time,
mark,
audio,
video {
  margin: 0;
  padding: 0;
  border: 0;
  vertical-align: baseline;
}

input,
textarea,
button,
select,
a {
  -webkit-tap-highlight-color: transparent;
}

/* HTML5 display-role reset for older browsers */
article,
aside,
details,
figcaption,
figure,
footer,
header,
hgroup,
menu,
nav,
section {
  display: block;
}

ol,
ul {
  list-style: none;
}

button {
  cursor: pointer;
  font-family: inherit;
}
이미지 domain 추가하기
- next.config.js에서 이미지 url의 domain을 추가해주어야 한다.
▼ myapp/next.config.js
/** @type {import('next').NextConfig} */
const nextConfig = {
  images: {
    domains: ['lecture-1.vercel.app', 'search.pstatic.net'],
  },
  reactStrictMode: true,
};

module.exports = nextConfig;
- 위처럼 domain을 추가해주어도 error가 발생하여 Image 태그에 unoptimized 속성을 true로 설정해주었다.
▼ myapp/components/home/DetailContent.tsx
            <Image
              src={image}
              alt=""
              fill
              style={{ objectFit: 'cover' }}
              unoptimized={true}
              placeholder="blur"
              blurDataURL="data:image/png;base64,iVBORw0KGgoAAAANSUhEUgAAAAEAAAABCAYAAAAfFcSJAAAADUlEQVR42mO0WhFsDwADzwF2mLYSJgAAAABJRU5ErkJggg=="
            />
DetailContent 컴포넌트
▼ myapp/components/home/DetailSection.tsx
- ▽ DetailContent 컴포넌트에 props로 현재 매장 정보(currentStore)와 확장 여부(expanded)를 전달하여 호출한다,
<DetailContent currentStore={currentStore} expanded={expanded} />▼ myapp/components/home/DetailContent.tsx
import { Store } from '@/types/store';
import { IoCallOutline, IoLocationOutline } from 'react-icons/io5';
import Naver from 'public/imges/naver.png';
import styles from '../../styles/detail.module.scss';
import Image from 'next/image';
type Props = {
currentStore?: Store;
expanded: boolean;
};
const DetailContent = ({ currentStore, expanded }: Props) => {
if (!currentStore) return null;
return (
<div
className={`${styles.detailContent} ${expanded ? styles.expanded : ''}`}
>
<div className={styles.images}>
{currentStore.images.slice(0, 3).map((image) => (
<div
key={image}
style={{ position: 'relative', maxWidth: 120, height: 80 }}
>
<Image
src={image}
alt=""
fill
style={{ objectFit: 'cover' }}
unoptimized={true}
placeholder="blur"
blurDataURL="data:image/png;base64,iVBORw0KGgoAAAANSUhEUgAAAAEAAAABCAYAAAAfFcSJAAAADUlEQVR42mO0WhFsDwADzwF2mLYSJgAAAABJRU5ErkJggg=="
/>
</div>
))}
</div>
{expanded && (
<>
<div className={styles.description}>
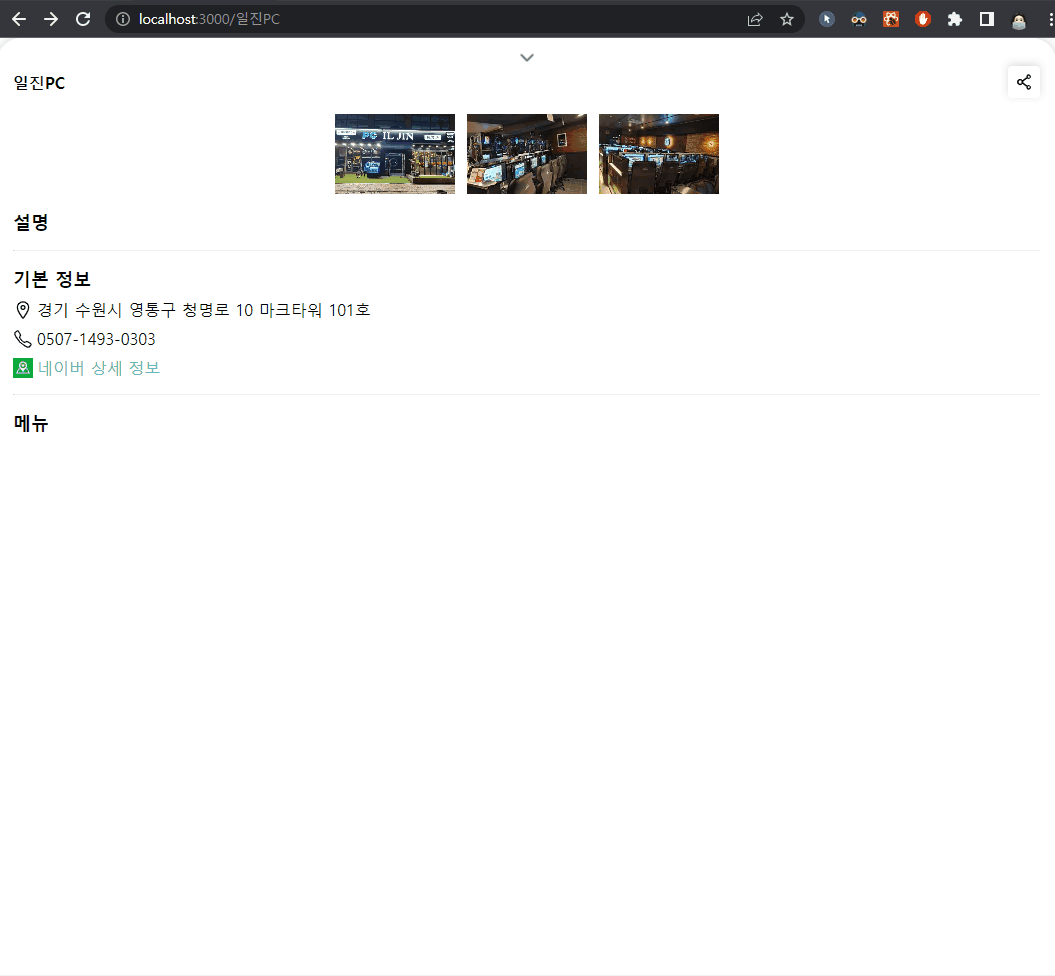
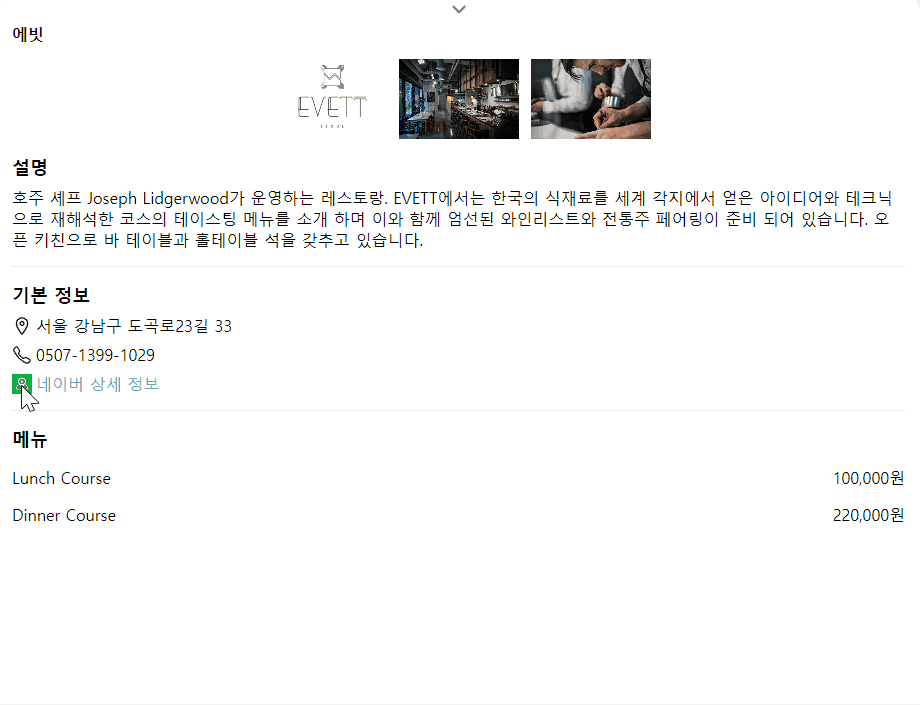
<h2>설명</h2>
<p>{currentStore.description}</p>
</div>
<hr />
<div className={styles.basicInfo}>
<h2>기본 정보</h2>
<div className="address">
<IoLocationOutline size={20} />
<span>{currentStore.address || '정보가 없습니다.'}</span>
</div>
<div className="phone">
<IoCallOutline size={20} />
<span>{currentStore.phone || '정보가 없습니다.'}</span>
</div>
<div className={'naverUrl'}>
<Image src={Naver} width={20} height={20} alt="" />
<a
href={`https://pcmap.place.naver.com/restaurant/${currentStore.nid}/home`}
target="_blank"
rel="noreferrer noopener"
>
<span>네이버 상세 정보</span>
</a>
</div>
</div>
<hr />
<div className={styles.menus}>
<h2>메뉴</h2>
<ul>
{currentStore.menus?.map((menu) => (
<li className={styles.menu} key={menu.name}>
<span className={styles.name}>{menu.name}</span>
<span className={styles.price}>{menu.price}</span>
</li>
))}
</ul>
</div>
</>
)}
</div>
);
};
export default DetailContent;▼ myapp/styles/detail.module.scss
.detailContent {
  height: 100%;
  overflow: hidden;
  &.expanded {
    overflow: scroll;
    &::-webkit-scrollbar {
      display: none;
    }
  }
  .images {
    display: grid;
    grid-template-columns: repeat(3, minmax(auto, 120px));
    justify-content: center;
    gap: 12px;
    margin-bottom: 16px;
  }

  h2 {
    font-size: 1.125rem;
    font-weight: 600;
    margin: 8px 0;
  }

  hr {
    border-bottom: none;
    border-top: 1px solid #eef0f3;
    margin: 16px 0;
  }

  .description {
    p {
      margin: 4px 0;
    }
  }

  .basicInfo {
    div {
      display: flex;
      align-items: center;
      margin-bottom: 8px;

      span {
        margin-left: 4px;
        font-size: 1rem;
      }

      a {
        color: #64c0a9;
      }
    }
  }

  .menus {
    .menu {
      display: flex;
      justify-content: space-between;
      margin-top: 16px;

      .name {
        max-width: 70%;
        word-break: keep-all;
      }
    }
  }
}
getStaticProps & getStaticPaths
getStaticProps
: 빌드 시 데이터를 fetch하여 static 페이지를 생성한다.
export async function getStaticProps(context) {
  return {
    props: {}, // will be passed to the page component as props
  }
}
getStaticPaths
: 동적 라우팅 페이지 중, 빌드 시에 static하게 생성할 페이지를 미리 정한다.
- params 안의 값에 대해서만 미리 페이지를 렌더링한다.
// pages/posts/[id].js

// Generates `/posts/1` and `/posts/2`
export async function getStaticPaths() {
  return {
    paths: [{ params: { id: '1' } }, { params: { id: '2' } }],
    fallback: false, // can also be true or 'blocking'
  }
}

// `getStaticPaths` requires using `getStaticProps`
export async function getStaticProps(context) {
  return {
    // Passed to the page component as props
    props: { post: {} },
  }
}

export default function Post({ post }) {
  // Render post...
}
fallback 값에 따른 비교
fallback : false
- getStaticPaths에서 리턴하지 않은 페이지는 모두 404로 연결한다.
fallback : true
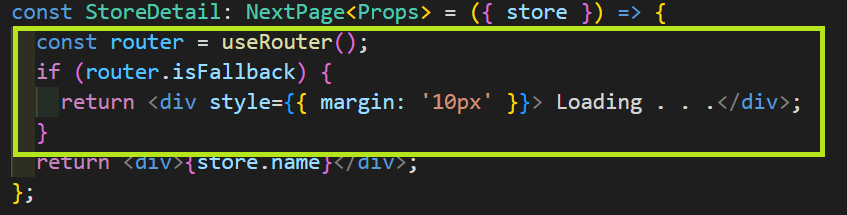
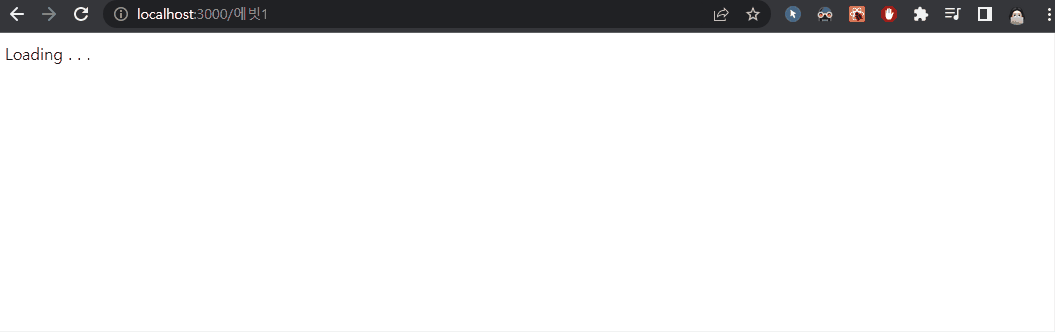
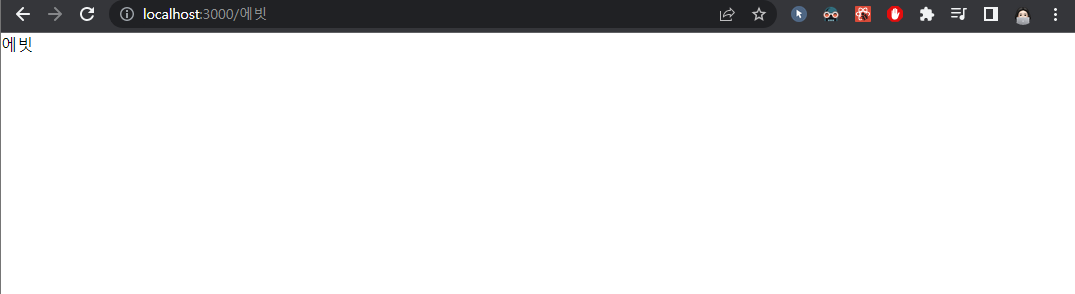
- getStaticPath에서 리턴하지 않은 페이지 접속했을 때,
- 사용자에게 fallback 페이지를 보여준다.
- 서버에서 static하게 페이지를 생성한다.
- 해당 페이지를 사용자에게 보여준다.
- 첫 사용자 이후 다음부터 접속하는 사용자에게는 static한 페이지를 보여준다.
- 많은 static 페이지를 생성해야 하지만 빌드 시간이 너무 오래 걸릴 경우 사용한다.
- getStaticProps에서 props가 없을 경우를 정의해야하고,
화면 리턴 시 라우터의 fallback 여부를 확인하여 Loading 문구를 띄워주어야 한다.
fallback : blocking
- getStaticPaths에서 리턴하지 않은 페이지 접속했을 때,
- 사용자에게 fallback 페이지나 로딩 화면 없이 server side renering한 static 페이지를 보여준다.
- 첫 사용자 이후 다음부터 접속하는 사용자에게는 server side rendering한 페이지를 보여준다.
- getStaticProps 함수가 return될 때까지 UI를 가만히 blocking 함
- 동적 라우팅 페이지를 static 페이지로 제공해야 할 때 사용한다.
각 매장의 상세 페이지 연결하기
- 동적 페이지를 생성하기 위해서는 pages 디렉토리에 [id].tsx 형식의 파일을 생성해야 한다. (id 값은 props)
▼ pages/[name].tsx
import { Store } from '@/types/store';
import { GetStaticPaths, GetStaticProps, NextPage } from 'next';
interface Props {
store: Store;
}
const StoreDetail: NextPage<Props> = ({ store }) => {
return <div>{store.name}</div>;
};
export default StoreDetail;
export const getStaticPaths: GetStaticPaths = async () => {
const stores = (await import('public/stores.json')).default;
const paths = stores.map((store) => ({ params: { name: store.name } }));
return { paths, fallback: false };
};
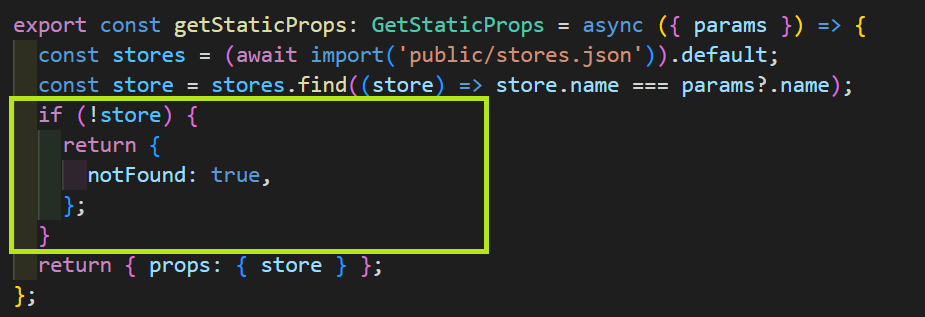
export const getStaticProps: GetStaticProps = async ({ params }) => {
const stores = (await import('public/stores.json')).default;
const store = stores.find((store) => store.name === params?.name);
return { props: { store } };
};
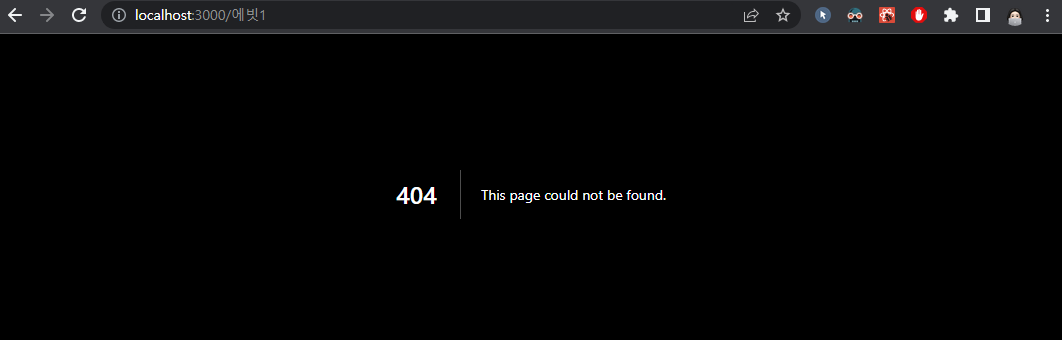
404 페이지 custom 하기
- 404 페이지를 custom 하려면 pages 디렉토리에 404.tsx 를 생성해야 한다.
▼ myapp/pages/404.tsx
const Custom404 = () => {
  return (
    <div style={{ textAlign: 'center' }}>해당 매장을 찾을 수 없습니다.</div>
  );
};

export default Custom404;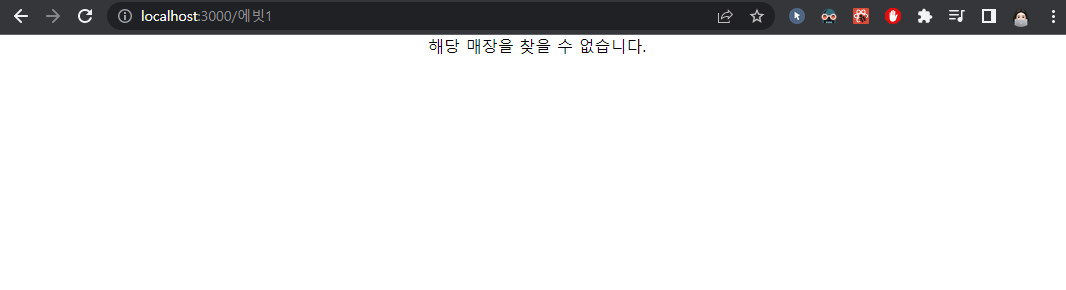
상세 페이지 UI 구현하기
DetailSection의 Header 분리 & 공유 기능 추가하기
▼ myapp/components/home/DetailHeader.tsx
- ▽ Header를 분리하고, 공유 버튼을 추가한다.
- ▽ 공유 버튼을 클릭하면 클립보드에 현재 url 이 복사되도록 한다.
import { Store } from '@/types/store';
import copy from 'copy-to-clipboard';
import { AiOutlineShareAlt } from 'react-icons/ai';
import { IoIosArrowUp } from 'react-icons/io';
import styles from '../../styles/detail.module.scss';
import headerStyles from '../../styles/header.module.scss';

interface Props {
  currentStore?: Store;
  expanded: boolean;
  onClickArrow: () => void;
}
const DetailHeader = ({ currentStore, expanded, onClickArrow }: Props) => {
  return (
    <div className={styles.header}>
      <button
        className={`${styles.arrowButton} ${expanded ? styles.expanded : ''}`}
        onClick={onClickArrow}
        disabled={!currentStore}
      >
        <IoIosArrowUp size={20} color="#666666" />
      </button>
      {!currentStore && <p className={styles.title}>매장을 선택해 주세요.</p>}
      {currentStore && (
        <div className={styles.flexRow}>
          <p className={styles.title}>{currentStore.name}</p>
          <button
            className={headerStyles.box}
            onClick={() => {
              copy(location.origin + '/' + currentStore.name);
            }}
          >
            <AiOutlineShareAlt size={20} />
          </button>
        </div>
      )}
    </div>
  );
};

export default DetailHeader;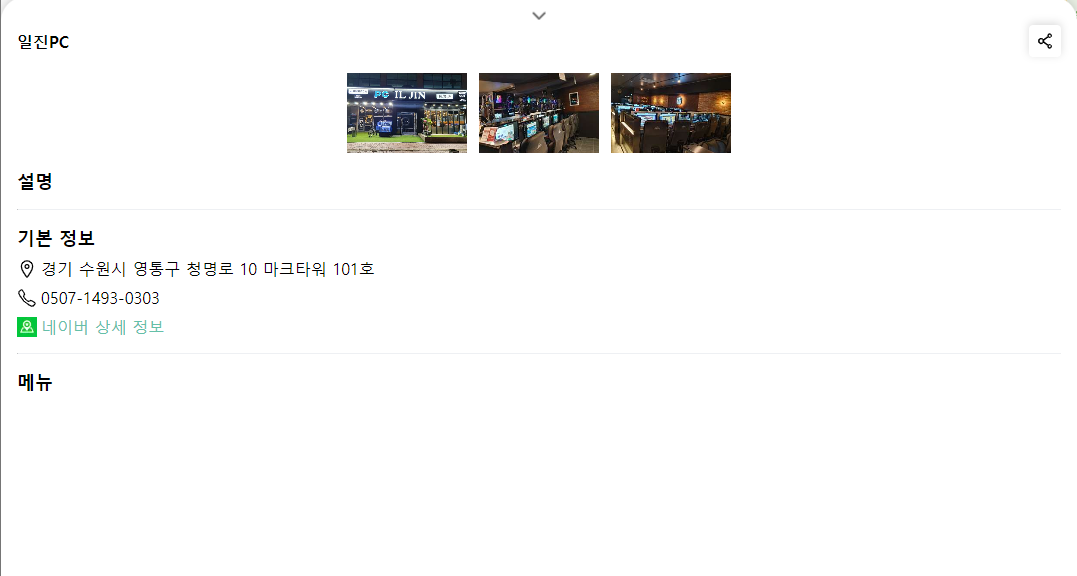
상세페이지 UI 구현하기
▼ myapp/pages/[name].tsx
- ▽ detailSection과 똑같이 구현하되, 접기 화살표 버튼 클릭 시 현재 선택된 매장이 표시된 map으로 url을 이동한다.
const StoreDetail: NextPage<Props> = ({ store }) => {
  const expanded = true;

  const router = useRouter();
  const { setCurrentStore } = useCurrentStore();

  const goToMap = () => {
    setCurrentStore(store);
    router.push(
      `/?zoom=15&lat=${store.coordinates[0]}&lng=${store.coordinates[1]}`
    );
  };

  return (
    <div className={`${styles.detailSection} ${styles.expanded}`}>
      <DetailHeader
        currentStore={store}
        expanded={expanded}
        onClickArrow={goToMap}
      />
      <DetailContent currentStore={store} expanded={expanded} />
    </div>
  );
};