
인프런 '박용주 지식 공유자님' 의 [Next.js 시작하기] 강의를 수강하고 작성한 게시글입니다.
Next.js 시작하기(feat. 지도 서비스 개발) - 인프런 | 강의
Next.js의 기본을 다루는 강의입니다. Next.js로 지도 서비스를 처음부터 끝까지 개발해봅니다., - 강의 소개 | 인프런...
www.inflearn.com
Header 컴포넌트 작성하기
▼ components/Header.tsx
import Link from 'next/link';
import styles from '../src/styles/header.module.scss';
interface Props {}
const HeaderComponent = ({}: Props) => {
    return (
        <header className={styles.header}>
            <div className={styles.flexItem}>
                <Link href="/" className={styles.box}>
                    <img
                        src="https://lecture-1.vercel.app/inflearn.png"
                        width={110}
                        height={20}
                    />
                </Link>
            </div>
        </header>
    );
};

export default HeaderComponent;
▼ src/styles/header.module.scss
.header {
    position: absolute;
    top: 0;
    left: 0;

    width: 100%;
    height: 48px;
    padding: 0 8px 0 12px;

    display: flex;
    justify-content: space-between;
    align-items: center;

    z-index: 100;
    pointer-events: none;
  }

  .flexItem {
    display: flex;
    pointer-events: auto;
  }

  .box {
    padding: 6px;
    border: none;
    border-radius: 4px;
    box-shadow: 0 -2px 8px 0 rgba(136, 136, 136, 0.3);

    display: flex;
    align-items: center;
    justify-content: center;

    background-color: #ffffff;
    &:active {
      background-color: #40a6fd;
      color: white;
    }
    transition: background-color 200ms ease;
  }
# scss / sass install
| $ npm i --save-dev sass |
# img 태그로 이미지 넣는 법
- public 폴더에 이미지 파일 넣기
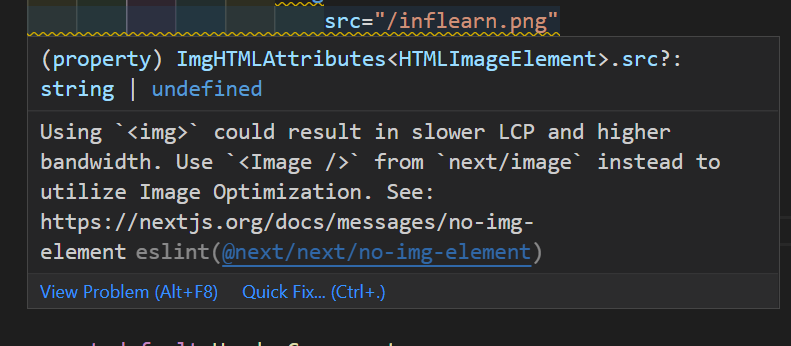
<img src="/inflearn.png" width={110} height={20}/> - 배포가 되어있는 외부 링크 사용하기
<img src="https://lecture-1.vercel.app/inflearn.png" width={110} height={20}/>
# lazy loading 구현
- img 태그에 loading="lazy" 추가
- 처음에는 네트워크 요청을 하지 않는다
- 스크롤을 내리다가 특정 threshold를 넘으면 lazy하게 이미지를 다운로드 함
- 이미지 태그를 사용하면 아래처럼 next/image를 사용하라는 메세지가 뜬다.
next/image
# next/image 사용하기
# next/image에서 소스파일을 static하게 impot 하기

# 장점
- 자동으로 이미지 용량 최적화 해 준다.
webp 형식이기 때문에 훨씬 더 작은 용량으로 이미지 사용 가능하다.
build 타임에 이미지의 정보 (너비와 높이 등)을 알 수 있어 미리 최적화한다. - lazy loading 자동으로 적용한다.
- placeholder="blur" 하면 사진이 다운로드 되는 동안 자동으로 블러 처리 된다.
# next/image에서 외부 링크로 사진 넣기
- 외부 링크의 사진을 넣을 경우 반드시 크기 입력해주어야만 크기에 맞춰서 정적으로 이미지를 최적화함
- 만약 너비와 높이 모를 때에는 next image 사용 어렵다.
fill 속성을 주면 이미지의 크기가 부모에 의해 결정된다.
# Server Error 해결
- 외부링크로 Image를 넣었을 때 아래와 같은 오류가 뜰 수 있다.
Server Error
Error: Invalid src prop (http://lecture-1.vercel.app/example.jpg) on `next/image`, hostname "lecture-1.vercel.app" is not configured under images in your `next.config.js` See more info: https://nextjs.org/docs/messages/next-image-unconfigured-host
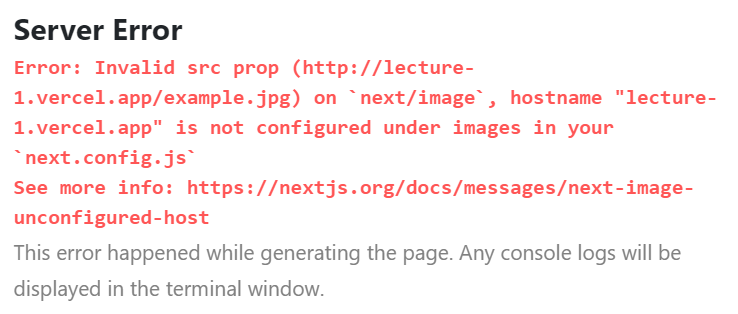
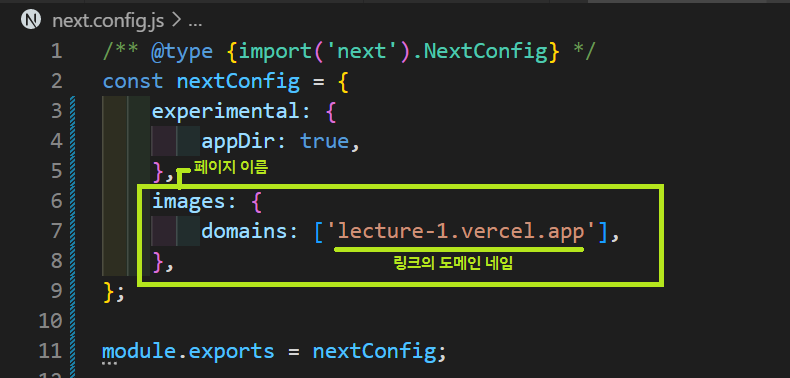
- next.config.js 파일에 아래 코드를 추가하여 server Error를 해결할 수 있다.
Header Component 완성하기
▼ components/Header.tsx
import Link from 'next/link';
import Image from 'next/image';
import styles from '../src/styles/header.module.scss';
import React from 'react';
interface Props {
    rightElements?: React.ReactElement[];
}
const HeaderComponent = ({ rightElements }: Props) => {
    return (
        <header className={styles.header}>
            <div className={styles.flexItem}>
                <Link href="/" className={styles.box}>
                    <Image
                        src="/inflearn.png"
                        width={110}
                        height={20}
                        alt="인프런 로고"
                    />
                </Link>
            </div>
            <div className={styles.flexItem}>
                {rightElements && (
                    <div className={styles.flexItem}>{rightElements}</div>
                )}
            </div>
        </header>
    );
};

export default HeaderComponent;
▼ src/pages/index.tsx
import Header from 'components/Header';
import { Fragment } from 'react';
import Link from 'next/link';
import styles from '../styles/header.module.scss';
import { AiOutlineShareAlt } from 'react-icons/ai';
import { VscFeedback } from 'react-icons/vsc';

const Home = () => {
    return (
        <Fragment>
            <Header
                rightElements={[
                    <button
                        onClick={() => alert('복사')}
                        className={styles.box}
                        style={{ marginRight: 8 }}
                        key="button"
                    >
                        <AiOutlineShareAlt size={20} />
                    </button>,
                    <Link href="/feedback" key="link" className={styles.box}>
                        <VscFeedback size={20} />
                    </Link>,
                ]}
            />

            <main></main>
        </Fragment>
    );
};

export default Home;
▼ src/pages/feedback.tsx
import Header from 'components/Header';
import { Fragment } from 'react';
const FeedBack = () => {
    return (
        <Fragment>
            <Header />
            <main></main>
        </Fragment>
    );
};

export default FeedBack;
# React icon 다운로드
React Icons
React Icons Include popular icons in your React projects easily with react-icons, which utilizes ES6 imports that allows you to include only the icons that your project is using. Installation (for standard modern project) npm install react-icons --save Usa
react-icons.github.io
| $ npm i react-icons -- save |
- 인프런 로고 클릭하면 홈페이지 ( / ) 로 이동
- 공유 버튼 클릭하면 alert 알림 창 띄움 ( 추후 기능 구현 예정 )
- feedback 버튼 클릭하면 피드백 링크 ( /feedback ) 으로 이동

)