
스파르타코딩클럽 - [왕초보] 나만의 수익성 앱, 앱개발 종합반 강의를 듣고 내용을 정리한 게시글입니다.
스파르타코딩클럽
5주 완성! 코딩을 전혀 모르는 비개발자 대상의 웹개발 강의
spartacodingclub.kr
API (Application Programming Interface)
API
: 서버 쪽에서 정한 규칙
- 앱에서 서버에 데이터를 요청하거나 데이터를 보내는 대화를 하려면 서버가 정한 규칙에 따라 대화 요청을 해야한다.
- 정한 규칙에 따라 요청을 하지 않으면 응답이 오지 않는다.
- 그 규칙을 API 라고 부른다.
- 그 규칙의 형태는 서버가 제공하는 도메인일 수도 있고, 서버가 만들어놓은 함수를 그냥 이용해서 사용하는 규칙일 수도 있다.
- 서버가 앱에 데이터를 줄 땐 JSON 형태로 데이터를 전달해준다.
React Native에 주로 데이터를 준비하는 시점
- 앱 화면이 그려진 다음 데이터를 준비 (useEffect)
- 앱에서 사용자가 저장 버튼을 눌렀을 때 (ex. 팁 찜하기 버튼)
서버 API
: 서버가 제공하는 도메인을 그대로 사용하는 방식
날씨 API 사용하기
openweathermap api
- 날씨 데이터를 제공해주는 일정 요청에 대해서는 무료 API를 제공해주는 openweathermap api를 사용한다.
Сurrent weather and forecast - OpenWeatherMap
Access current weather data for any location on Earth including over 200,000 cities! The data is frequently updated based on the global and local weather models, satellites, radars and a vast network of weather stations. how to obtain APIs (subscriptions w
openweathermap.org
- 현재 위치(좌표) 데이터 가져오기
- 위치 데이터를 이용해 현재 위치 날씨 데이터 가져오기
Expo location
Location
Expo is an open-source platform for making universal native apps for Android, iOS, and the web with JavaScript and React.
docs.expo.dev
- expo location 설치하기
| $ expo install expo-location |
▼ myapp/pages/MainPage.js
- expo-location 라이브러리 import 하기
- getLocation 함수 작성
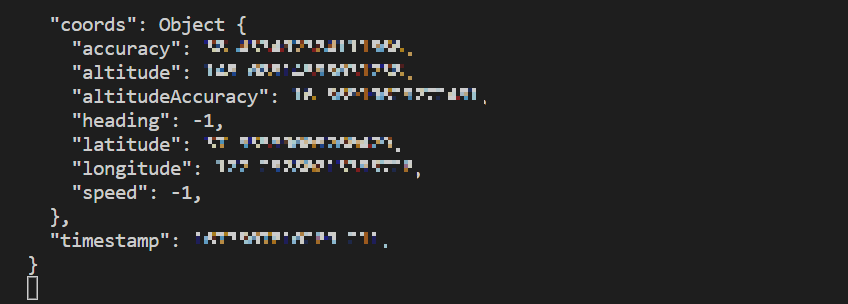
위치 접근 권한을 받고, 현재 위치 데이터를 locationData에 저장하고 콘솔에 출력한다.
만약 에러 발생 시 경고창을 띄운다 - 앱을 시작함과 동시에 위치 접근 권한을 받아오기 위해 useEffect안에 getLocation 함수를 실행한다.
import * as Location from "expo-location"; const getLocation = async () => {
try {
//자바스크립트 함수의 실행순서를 고정하기 위해 쓰는 async,await
await Location.requestForegroundPermissionsAsync();
const locationData = await Location.getCurrentPositionAsync();
console.log(locationData);
} catch (error) {
Alert.alert("위치를 찾을 수가 없습니다.", "앱을 껏다 켜볼까요?");
}
}; getLocation();- 앱 실행 시 위치 권한 허용 창이 뜨고, 유저가 허용을 하면, 위치 데이터를 받아와 콘솔창에 출력한다.
- 여기에서 latitude 값과 longitude 값을 사용해 날씨 데이터를 얻어올 것이다.

axios
: 서버가 제공하는 도메인 형식의 API를 사용하기 위한 도구
- axios 설치하기
| $ yarn add axios |
▼ myapp/pages/MainPage.js
- axios import 하기
import axios from "axios"- 상태 weather 생성하고, temp와 condition을 기본값으로 초기화하기
  const [weather, setWeather] = useState({
    temp: 0,
    condition: "",
});- getLocation 함수 수정
openweather 사이트 회원가입 후 본인의 API를 API_KEY에 넣고.
경도, 위도, API KEY 값을 넘겨 result에 저장하고, temp와 condition 값을 각각 저장하고 해당 값으로 setWeather한다.
      const latitude = locationData["coords"]["latitude"];
      const longitude = locationData["coords"]["longitude"];
      const API_KEY = "write your API KEY!";
      const result = await axios.get(
        `http://api.openweathermap.org/data/2.5/weather?lat=${latitude}&lon=${longitude}&appid=${API_KEY}&units=metric`
      );
      const temp = result.data.main.temp;
      const condition = result.data.weather[0].main;
      setWeather({
        temp,
        condition,
      });
- 상태 weather의 temp와 condition 값으로 화면에 오늘의 날씨를 표시한다.
      <Text style={styles.weather}>
        오늘의 날씨: {weather.temp + "°C  | " + weather.condition}{" "}
      </Text>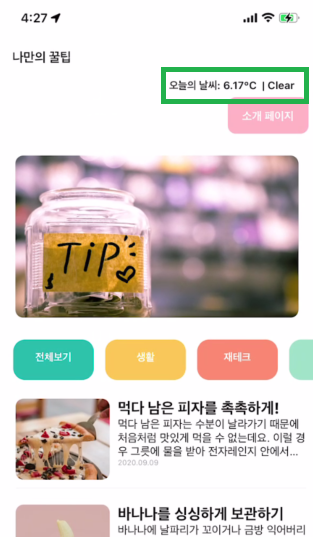
파이어베이스(firebase)
서버리스
: 서버를 직접 구현, 구성할 필요 없이 필요한 서버 기능을 제공하는 곳에서 서비스를 사용하는 것
앱에서 필요한 기능들
- 꿀팁을 서버로부터 가져오기
서버에 데이터를 저장해두고, API 형태로 불러와서 사용하면 실시간 업데이트 현황이 앱에 반영이 된다. - 꿀팁 찜하기
다른 기기에서 로그인했을 때 해당 유저의 데이터를 확인하려면, 데이터가 관리되어야 어디서든 사용자 데이터를 관리하고 보여줄 수 있다.
파이어베이스 연결하기
Firebase
Firebase는 고품질 앱을 빠르게 개발하고 비즈니스를 성장시키는 데 도움이 되는 Google의 모바일 플랫폼입니다.
firebase.google.com
- 파이어베이스 회원가입/로그인 하고 새 프로젝트를 생성한다.
| $ expo install firebase |
▼ myapp/firebaseConfig.js
import firebase from "firebase/compat/app";
import "firebase/compat/database";
import "firebase/compat/storage";
const firebaseConfig = {
apiKey: "your key",
authDomain: "myfirstreactnativeapp-7f436.firebaseapp.com",
projectId: "myfirstreactnativeapp-7f436",
storageBucket: "myfirstreactnativeapp-7f436.appspot.com",
messagingSenderId: "470138618125",
appId: "1:470138618125:web:9034eb4c1408046a04f044",
measurementId: "G-1PT0EF2JWX",
};
if (!firebase.apps.length) {
firebase.initializeApp(firebaseConfig);
}
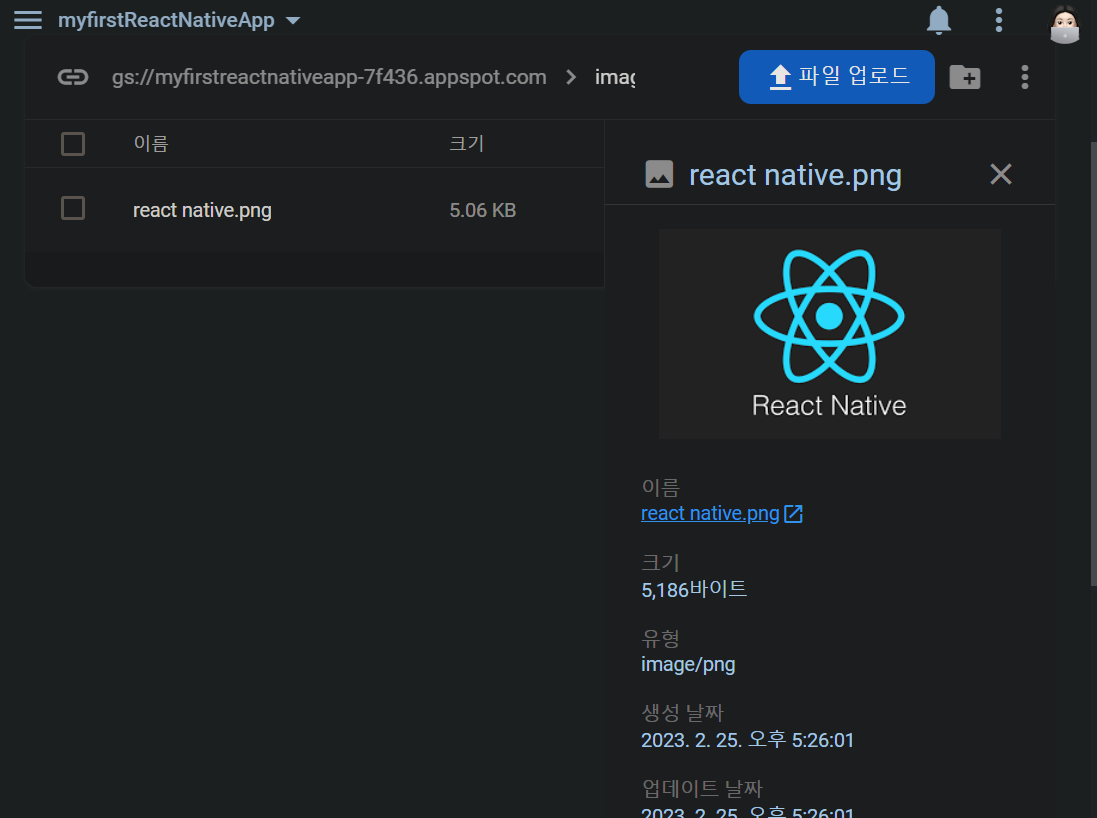
export const firebase_db = firebase.database();파일 저장소 스토리지(Storage)
- 파이어베이스에서 메뉴 -> 빌드 -> storage에 images 폴더 생성하고 해당 폴더에 이미지 업로드하기
리얼타임 데이터베이스 - 설정 / 가져오기 / 쓰기
리얼타임 데이터베이스
: 파이어베이스에서 JSON 데이터를 실시간으로 바로바로 조회하고, 수정 변경할 수 있게 존재시킨 데이터베이스 저장소
- 이미지 저장 -> 파일 저장소 스토리지
- JSON 데이터 -> 리얼 타임 데이터베이스
리얼타임 데이터베이스 - 설정하기
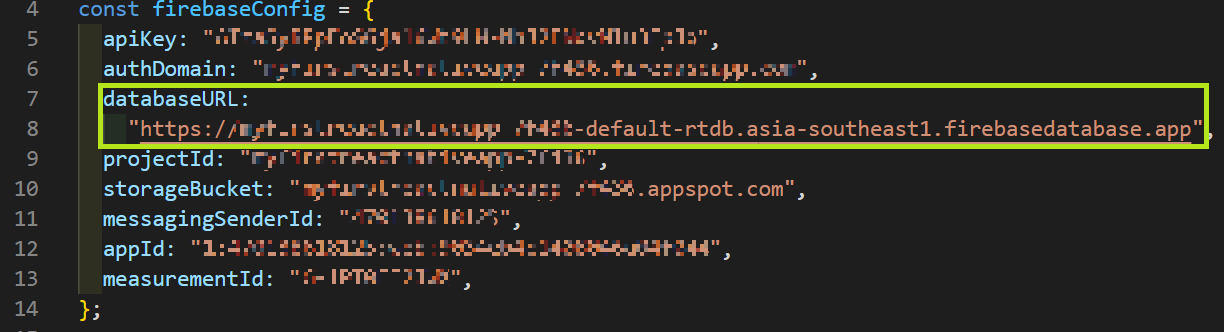
- firebaseConfig.js 파일 내에 firebaseConfig에 databaseURL 추가하기
- databaseURL은 실시간 데이터베이스에 들어갔을 때 보이는 주소로 입력한다.

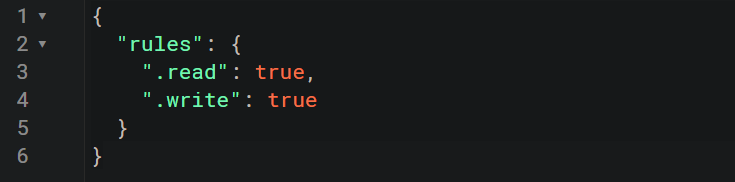
- 규칙 read와 write 모두 true로 설정하기
- JSON 가져오기로 myapp 디렉토리 안에서 사용중인 data.json 파일 가져오기
리얼타임 데이터베이스 - 전체 데이터 읽기
- 전체 조회 함수
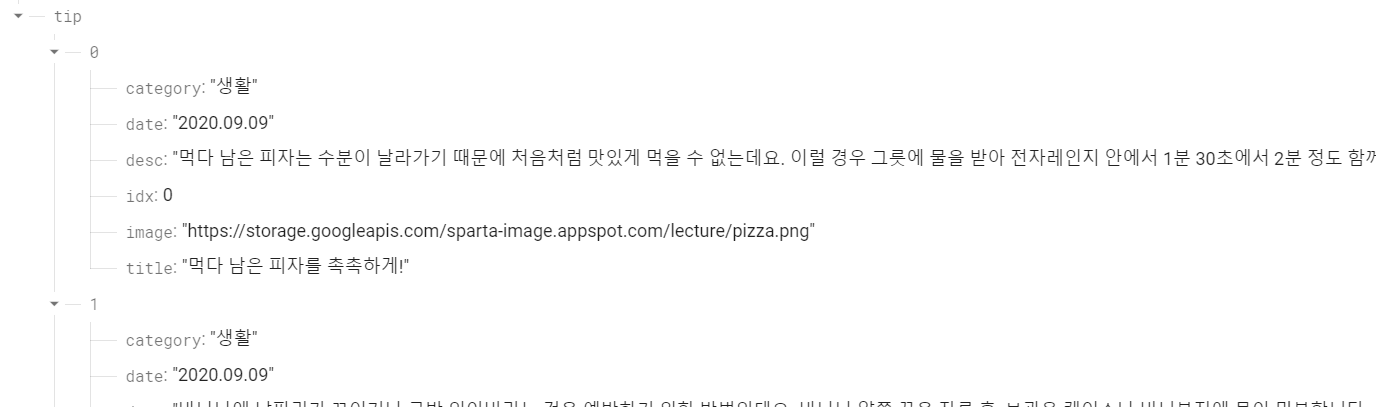
firebase_db.ref('/tip').once('value').then((snapshot) => {
   let tip = snapshot.val();
})
- 조회한 데이터는 snapshot 부분에 담겨서 {} 내부에서 사용 가능
- 그 중 실제 우리에게 필요한 데이터는 snapshot.val()로 가져와 변수에 담아 사용 가능
▼ myapp/pages/MainPage.js
- firebaseConfig.js에서 export한 firebase_db를 import하기
- useEffect 내에서 firebase_db에서 tip 데이터를 가져와 setState와 setCateState해 준다.
import { firebase_db } from "../firebaseConfig"; useEffect(() => {
navigation.setOptions({
title: "나만의 꿀팁",
});
setTimeout(() => {
firebase_db
.ref("/tip")
.once("value")
.then((snapshot) => {
let tip = snapshot.val();
setState(tip);
setCateState(tip);
getLocation();
setReady(false);
});
}, 1000);
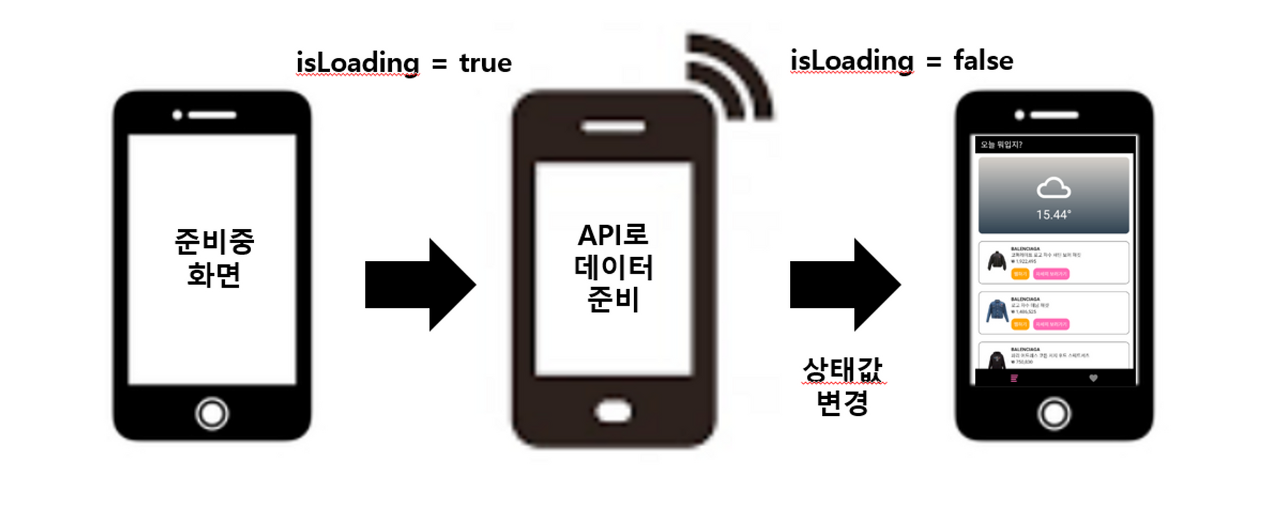
}, []);- 사용자들 마다 네트워크 상태가 모두 다르기 때문에, 무조건 몇 초 뒤에 실행 시키는 setTimeout 함수 기능보다, 파이어베이스 API의 실행 완료 시간에 맡겨두는 것이 더 낫다.
- 파이어베이스로부터 데이터를 가져와 준비할 때까지 로딩 화면을 보여줬다가, 데이터가 준비가되면 실제 본 화면을 보여주는 자연스러운 서비스 환경을 사용자들에게 제공해 줄 수 있다.
리얼타임 데이터베이스 - 특정 데이터 읽기
- 현재는 전체 데이터를 상세페이지로 넘겨주어 화면에 출력해주고 있다.
- 상세페이지의 데이터들이 실시간으로 변경될 수 있는데, 전체 데이터를 넘겨주는 방식에서는 변경된 데이터가 적용되지 않는다.
- 따라서 그때 그때 변경된 데이터가 항상 반영되는 파이어베이스 데이터베이스로부터 가져와야 한다.
- 큰 데이터들이 이동하는 것은 앱 퍼포먼스 저하의 원인이다.
-> 팁 idx 번호만 넘겨준 다음 DetailPage.js 에서 idx로 상세 꿀팁 정보를 서버로부터 조회해서 출력해 줄 것이다.
▼ myapp/components/Card.js
- DetailPage로 이동할 때, content 전체를 넘겨주지 않고 해당 idx 값만 넘겨준다.
    <TouchableOpacity
      style={styles.card}
      onPress={() => {
        navigation.navigate("DetailPage", { idx: content.idx });
      }}
    >
▼ myapp/pages/DetailPage.js
- firebaseConfig.js 로부터 firebase_db를 import한다.
- useEffect 에서 route.params.idx 값으로 해당 데이터를 파이어베이스에서 가져온다.
가져온 데이터를 setTip 해준다.
import { firebase_db } from "../firebaseConfig"; useEffect(() => {
navigation.setOptions({
title: route.params.title,
headerStyle: {
backgroundColor: "#000",
shadowColor: "#000",
},
headerTintColor: "#fff",
});
const { idx } = route.params;
firebase_db
.ref("/tip/" + idx)
.once("value")
.then((snapshot) => {
let tip = snapshot.val();
setTip(tip);
});
}, []);리얼타임 데이터베이스 - 데이터 수정하기
- 특정 사용자가 꿀팁 찜 버튼을 눌렀을 때, 사용자마다 고유한 정보를 관리하려면, 사용자 고유 ID값 데이터가 있어야, 어떤 사용자의 데이터인지 구분이 가능하다.
- expo는 사용할 사용자들의 고유 아이디를 생성해서 알려주므로, 이를 통해 사용자들마다 고유한 ID 값으로 데이터를 관리할 수 있다.
expo-application
Application
Expo is an open-source platform for making universal native apps for Android, iOS, and the web with JavaScript and React.
docs.expo.dev
| $ expo install expo-application |
▼ expo-application 사용방법
- id값은 운영체제가 ios인지, android인지에 따라 달라지므로, Platform.OS로 현재 os를 확인해야 한다.
import * as Application from 'expo-application';
const isIOS = Platform.OS === 'ios';


let uniqueId;
if(isIOS){
  let iosId = await Application.getIosIdForVendorAsync();
  uniqueId = iosId
}else{
  uniqueId = Application.androidId
}

console.log(uniqueId)
찜 데이터 저장하기
- 데이터를 수정하거나 저장할 때에는 원하는 ref에서 set 함수를 사용한다.
▼ myapp/pages/DetailPage.js
- expo-application을 import 한다.
현재 os가 무엇인지 isIOS 변수에 저장한다. - like 함수 작성
- isIOS에 따라 userUniqueId값을 받아온다.
- firebase_db에 /like/useUniqueId/tip.idx 의 ref에 접근해서 해당 데이터를 set함수를 이용하여 현재 상세 페이지에서 보여주고 있는 tip으로 저장한다.
- 저장이 완료되었으면 "찜 완료!" 알림창을 띄우고, 에러 발생 시, 에러를 콘솔 창에 출력한다.
- like 함수를 팁 찜하기 버튼을 클릭했을 때 실행되도록 한다.
import * as Application from "expo-application";
const isIOS = Platform.OS === "ios";
const like = async () => {
let userUniqueId = isIOS
? await Application.getIosIdForVendorAsync()
: await Application.androidId;
firebase_db
.ref("/like/" + userUniqueId + "/" + tip.idx)
.set(tip, (error) => {
console.log(error);
Alert.alert("찜 완료!");
});
}; <TouchableOpacity style={styles.button} onPress={() => like()}>
<Text style={styles.buttonText}>팁 찜하기</Text>
</TouchableOpacity>
4주차 과제 - 찜 해제 누르면 찜 삭제
▼ myapp/pages/LikePage.js
import React, { useState, useEffect } from "react";
import { ScrollView, StyleSheet } from "react-native";
import { StatusBar } from "expo-status-bar";
import LikeCard from "../components/LikeCard";
import { firebase_db } from "../firebaseConfig";
import * as Application from "expo-application";
const isIOS = Platform.OS === "ios";
export default function LikePage({ navigation, route }) {
const [tip, setTip] = useState([]);
useEffect(() => {
navigation.setOptions({
title: "꿀팁 찜",
});
getLike();
}, []);
const getLike = async () => {
let userUniqueId = isIOS
? await Application.getIosIdForVendorAsync()
: Application.androidId;
firebase_db
.ref(`/like/${userUniqueId}`)
.once("value")
.then((snapshot) => {
if (snapshot.val()) {
let likeTip = Object.values(snapshot.val());
setTip(likeTip);
}
});
};
return (
<ScrollView style={styles.container}>
<StatusBar style="auto" />
{tip.map((content, i) => {
return (
<LikeCard
content={content}
key={i}
navigation={navigation}
tip={tip}
setTip={setTip}
/>
);
})}
</ScrollView>
);
}
const styles = StyleSheet.create({
container: {
backgroundColor: "#fff",
marginTop: 10,
marginLeft: 10,
},
});
▼ myapp/components/LikeCard.js
import React from "react";
import {
Alert,
View,
Image,
Text,
StyleSheet,
TouchableOpacity,
} from "react-native";
import { firebase_db } from "../firebaseConfig";
import * as Application from "expo-application";
const isIOS = Platform.OS === "ios";
export default function LikeCard({ navigation, content, tip, setTip }) {
const remove = async (cidx) => {
let userUniqueId = isIOS
? await Application.getIosIdForVendorAsync()
: Application.androidId;
firebase_db
.ref("/like/" + userUniqueId + "/" + cidx)
.remove()
.then(() => {
Alert.alert("삭제 완료");
let result = tip.filter((data, i) => {
return data.idx !== cidx;
});
setTip(result);
});
};
return (
<View style={styles.card}>
<Image style={styles.cardImage} source={{ uri: content.image }} />
<View style={styles.cardText}>
<Text style={styles.cardTitle} numberOfLines={1}>
{content.title}
</Text>
<Text style={styles.cardDesc} numberOfLines={3}>
{content.desc}
</Text>
<Text style={styles.cardDate}>{content.date}</Text>
<View style={styles.buttonContainer}>
<TouchableOpacity
style={styles.button}
onPress={() => {
navigation.navigate("DetailPage", { idx: content.idx });
}}
>
<Text style={styles.buttonText}>자세히보기</Text>
</TouchableOpacity>
<TouchableOpacity
style={styles.button}
onPress={() => remove(content.idx)}
>
<Text style={styles.buttonText}>찜 해제</Text>
</TouchableOpacity>
</View>
</View>
</View>
);
}
const styles = StyleSheet.create({
card: {
flex: 1,
flexDirection: "row",
margin: 10,
borderBottomWidth: 0.5,
borderBottomColor: "#eee",
paddingBottom: 10,
},
cardImage: {
flex: 1,
width: 100,
height: 100,
borderRadius: 10,
},
cardText: {
flex: 2,
flexDirection: "column",
marginLeft: 10,
},
cardTitle: {
fontSize: 20,
fontWeight: "700",
},
cardDesc: {
fontSize: 15,
},
cardDate: {
fontSize: 10,
color: "#A6A6A6",
},
buttonContainer: {
flexDirection: "row",
},
button: {
width: 90,
marginTop: 20,
marginRight: 10,
marginLeft: 10,
padding: 10,
borderWidth: 1,
borderColor: "deeppink",
borderRadius: 7,
},
buttonText: {
color: "deeppink",
textAlign: "center",
},
});

'FRONTEND > React Native' 카테고리의 다른 글
| [React Native] 웹뷰 제작 (feat. expo) (0) | 2023.12.25 |
|---|---|
| [ REACT NATIVE ] 나만의 수익성 앱 개발 5주차 학습노트 (1) | 2023.03.05 |
| [ REACT NATIVE ] 나만의 수익성 앱 개발 3주차 학습노트 - ② (0) | 2023.02.25 |
| [ REACT NATIVE ] 나만의 수익성 앱 개발 3주차 학습노트 - ① (0) | 2023.02.24 |
| [ REACT NATIVE ] 나만의 수익성 앱 개발 2주차 학습노트 (0) | 2023.02.11 |