인프런 이정한님의 한입크기로 잘라 먹는 리액트(React.js) : 기초부터 실전까지 ] 강의 수강 후 강의의 내용을 정리하며 공부한 것을 쓴 게시글입니다.
한입 크기로 잘라 먹는 리액트(React.js) : 기초부터 실전까지 - 인프런 | 강의
개념부터 독특한 프로젝트까지 함께 다뤄보며 자바스크립트와 리액트를 이 강의로 한 번에 끝내요. 학습은 짧게, 응용은 길게 17시간 분량의 All-in-one 강의!, - 강의 소개 | 인프런...
www.inflearn.com
페이지 라우팅 0 - React SPA & CSR
# 라우팅
: 어떤 네트워크 내에서 통신 데이터를 보낼 경로를 선택하는 일련의 과정
- 경로를 정해주는 행위 자체
# 페이지 라우팅
: 요청에 명시되어 있는 경로에 따라 알맞은 페이지를 선택하게 하는 과정 자체
- 웹 서버가 처리
# MPA (Multipage Application)
: 여러 개의 페이지를 준비해놨다가 요청이 들어오면 요청에 맞는 페이지를 응답해주는 방식
# SPA (Single Page Application)
: 서버로부터 새로운 페이지를 불러오지 않고 현재의 페이지를 동적으로 다시 작성하는 방식
- 페이지 전환이 빠름
# CSR (Client Side Rendering)
: 클라이언트 측에서 렌더링을 진행
페이지 라우팅 1 - React Router 기본
# REACT ROUTER V6
: REACT에서 CSR기반의 페이지 라우팅을 할 수 있게 해주는 라이브러리
- react-router 모듈 사용 :
npm install react-router-dom@6- pages 폴더에 Home.js , Edit.js , New.js , Diary.js 파일 생성
- 라우팅을 test하기 위한 RouertTest 컴포넌트 작성
- a태그를 사용하지 않고 Link 태그 사용
- 링크는 to 키워드로 연결
import { Link } from "react-router-dom";

const RouterTest = () => {
  return (
    <div>
      <Link to={"/"}>HOME</Link>
      <br />
      <Link to={"/new"}>NEW</Link>
      <br />
      <Link to={"/diary"}>DIARY</Link>
      <br />
      <Link to={"/edit"}>EDIT</Link>
    </div>
  );
};

export default RouterTest;
- BrowserRouter, Route, Routes import
import { BrowserRouter, Route, Routes } from "react-router-dom";- Routes 태그 안에 Route 태그들을 작성하며 path 안에 경로를 적고, elenent 안에 컴포넌트들을 넣음
- Routes 태그 밖은 어떤 페이지에서도 동일하게 유지되는 코드
function App() {
  return (
    <BrowserRouter>
      <div className="App">
        <h2>App.js</h2>
        <Routes>
          <Route path="/" element={<Home />} />
          <Route path="/new" element={<New />} />
          <Route path="/edit" element={<Edit />} />
          <Route path="/diary" element={<Diary />} />
        </Routes>
        <RouterTest />
      </div>
    </BrowserRouter>
  );
}
페이지 라우팅 - React Router 응용
# React Router Dom의 유용한 기능
- Path Variable - useParams
- Query String - useSearchParams
- Page Moving - useNavigate
useParams 사용하기
- App.js 에서 Routh 의 path 수정
<Route path="/diary/:id" element={<Diary />} />- Diary 컴포넌트에서 id값 전달받기
import { useParams } from "react-router-dom"; const { id } = useParams();
console.log(id);-> http://localhost:3000/diary/123 접속하면 콘솔 창에 123 출력됨
useSerachParams 사용하기
- Edit 컴포넌트에서
import { useSearchParams } from "react-router-dom";const Edit = () => {
const [searchParams, setSearchParams] = useSearchParams();
const id = searchParams.get("id");
console.log(id);
const mode = searchParams.get("mode");
console.log(mode);
return (
<div>
<h1>Edit</h1>
<p>이곳은 일기 수정 페이지입니다.</p>
<button onClick={() => setSearchParams({ who: "choi" })}>
QS 바꾸기
</button>
</div>
);
};-> http://localhost:3000/edit/?id=123&mode=dark 접속하면 콘솔창에 123 과 dark가 출력됨
-> QS바꾸기 버튼 클릭하면 setSearchParams가 되므로, 링크가 http://localhost:3000/edit/?who=choi 로 바뀜
useNavigate 사용하기
- 링크 태그를 클릭하지 않아도 의도적으로 링크 바꾸기 가능
- Edit 컴포넌트에서 navigate하기
- 이전 페이지 이동 시 navigate(-1) 해줄 것
import { useNavigate } from "react-router-dom"; const navigate = useNavigate(); <button onClick={() => { navigate("/new");}}>NEW로 가기</button>
<button onClick={() => { navigate(-1);}}>뒤로 가기</button>-> New로가기 버튼 클릭 시 New 컴포넌트로 이동함
-> 뒤로가기 버튼 클릭 시 이전 페이지로 이동함
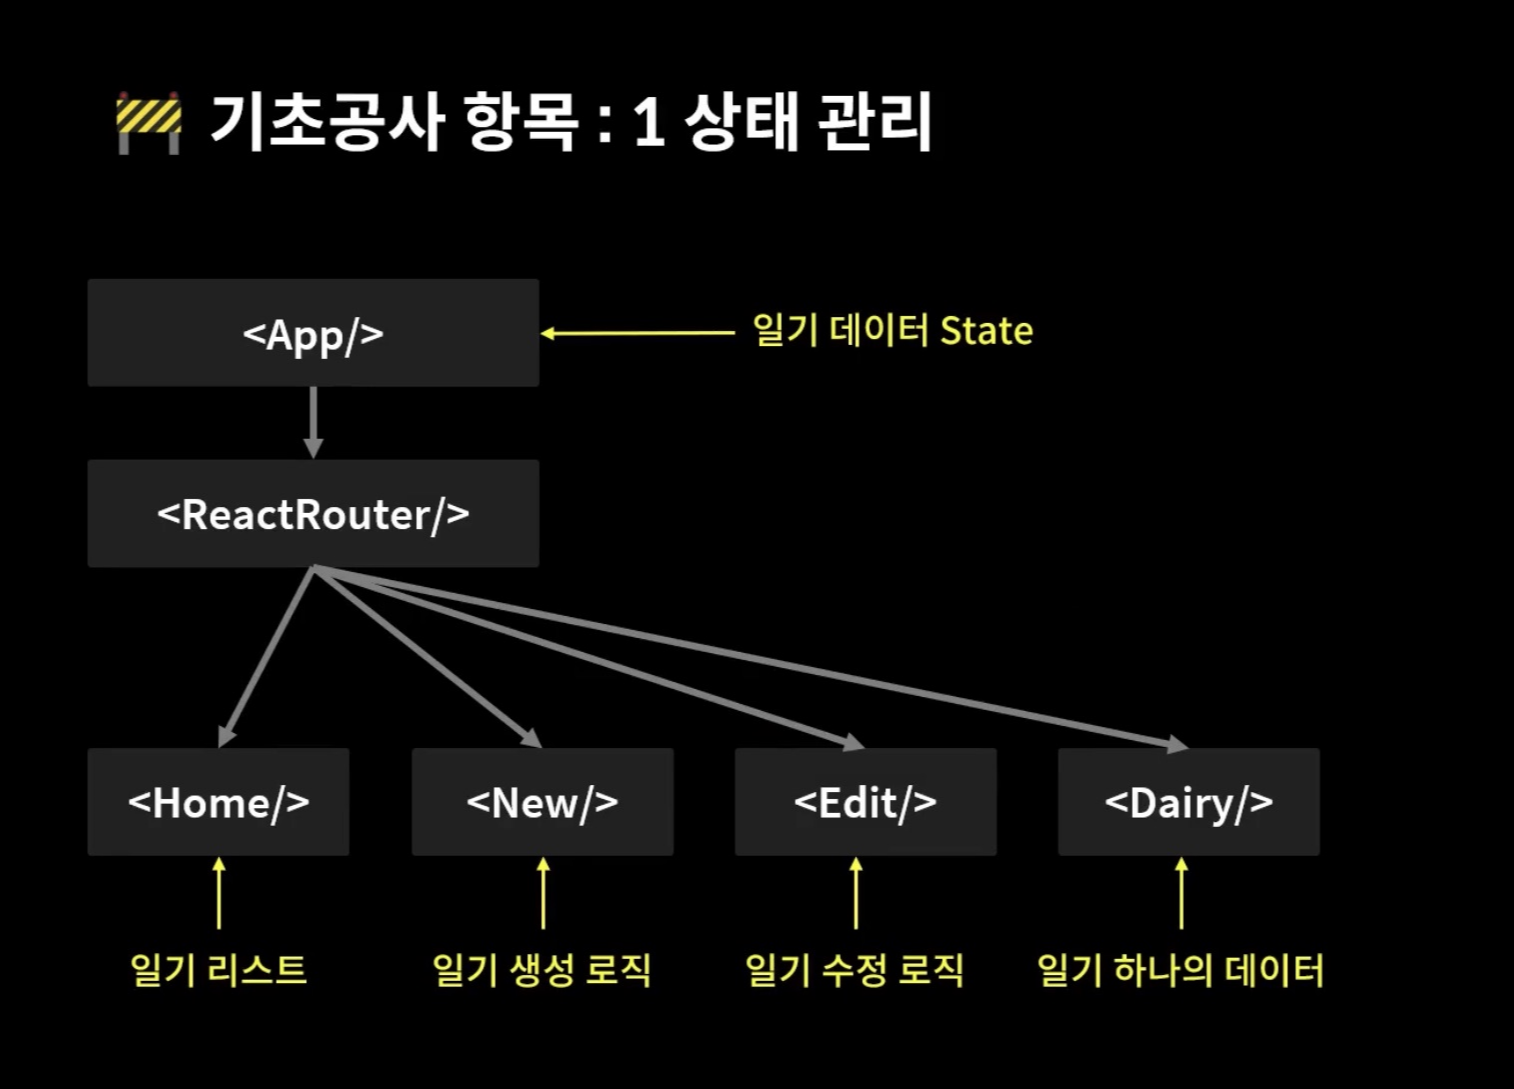
프로젝트 기초 공사 1
폰트 세팅
- 구글 폰트 (https://fonts.google.com/)에서 원하는 폰트 선택
- import 코드를 붙여넣기
- font-family로 사용가능
@import url("https://fonts.googleapis.com/css2?family=IBM+Plex+Sans+KR&family=Nanum+Myeongjo&display=swap");

body {
  font-family: "Nanum Myeongjo", serif;
}
레이아웃 세팅
- 화면 너비가 650px일때는 App 컴포넌트 너비를 640px로 하고, 화면 너비가 650px이하일때는 App 컴포넌트 너비를 90vw(view width)로 함
@import url("https://fonts.googleapis.com/css2?family=IBM+Plex+Sans+KR&family=Nanum+Myeongjo&display=swap");

body {
  background-color: lightslategray;
  display: flex;
  justify-content: center; /*가로축 기준 중앙 배치*/
  align-items: center;
  font-family: "Nanum Myeongjo", serif;
  min-height: 100vh; /*vh=view height*/
  margin: 0px;
}

/*650px 이상일때*/
@media (min-width: 650px) {
  .App {
    width: 640px;
  }
}

/*650px 이하일때*/
@media (max-width: 650px) {
  .App {
    width: 90vw;
  }
}

#root {
  background-color: lightsteelblue;
  box-shadow: rgba(165, 165, 255, 0.2) 0px 7px 29px 0px;
}

.App {
  min-height: 100vh;
  padding-left: 20px;
  padding-right: 20px;
}
이미지 에셋 세팅
- 강의자료의 emotion 이미지 다운로드해 public-assets에 넣기
- process.enc.PUBLIC_URL 을 하면 어떤 위치애 있던 public 폴더에 접근 가능
        <img src={process.env.PUBLIC_URL + "/assets/emotion1.png"} />
        <img src={process.env.PUBLIC_URL + "/assets/emotion2.png"} />
        <img src={process.env.PUBLIC_URL + "/assets/emotion3.png"} />
        <img src={process.env.PUBLIC_URL + "/assets/emotion4.png"} />
        <img src={process.env.PUBLIC_URL + "/assets/emotion5.png"} />
공통 컴포넌트 세팅
- 모든 페이지에 공통으로 사용되는 버튼, 헤더 컴포넌트 세팅
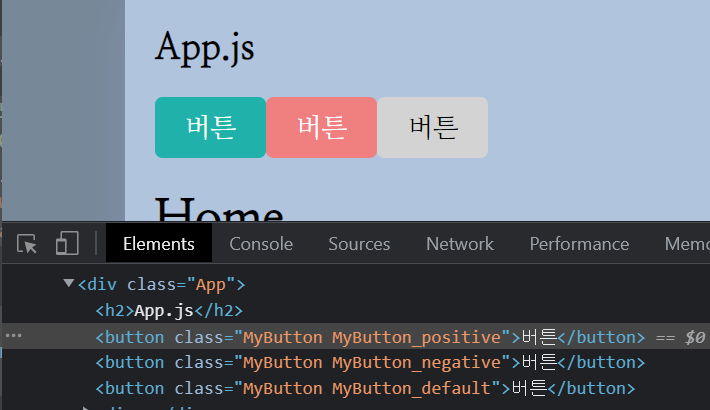
버튼 세팅
- MyButton 컴포넌트 생성
- type에 따라 버튼의 색을 다르게 처리
- 만약 type에 positive 혹은 negative 외에 다른 것이 들어오면 default 로 바꿈
- className을 여러개 쓸 때에는 배열로 전달 후 join 해줄것
const MyButton = ({ text, type, onClick }) => {
  const btnType = ["positive", "negative"].includes(type) ? type : "default";

  return (
    <button
      className={["MyButton", `MyButton_${btnType}`].join(" ")}
      onClick={onClick}
    >
      {text}
    </button>
  );
};

MyButton.defaultProps = {
  type: "default",
};

export default MyButton;
/* MyButton */
.MyButton {
cursor: pointer;
border: none;
border-radius: 5px;
padding: 10px 20px 10px 20px;
font-size: 18px;
white-space: nowrap;
font-family: "Nanum Myeongjo", serif;
}
.MyButton_default {
background-color: lightgray;
color: black;
}
.MyButton_positive {
background-color: lightseagreen;
color: white;
}
.MyButton_negative {
background-color: lightcoral;
color: white;
}
헤더 세팅
- MyHeader 컴포넌트 생성
- 가운데 text , 왼쪽자식, 오른쪽 자식으로 이루어짐
- 왼쪽자식, 오른쪽 자식에는 각각 버튼이 오거나 텍스트가 오거나 아무것도 없을수도 있음
const MyHeader = ({ headText, leftChild, rightChild }) => {
  return (
    <header>
      <div className="head_btn_left">{leftChild}</div>
      <div className="head_text">{headText}</div>
      <div className="head_btn_right">{rightChild}</div>
    </header>
  );
};

export default MyHeader;
/* Header */
header {
padding-top: 20px;
padding-bottom: 20px;
display: flex;
align-items: center;
border-bottom: 1px solid lightcyan;
}
header > div {
display: flex;
}
header .head_text {
width: 50%;
font-size: 25px;
justify-content: center;
}
header .head_btn_left {
width: 25%;
justify-content: start;
}
header .head_btn_right {
width: 25%;
justify-content: end;
}<MyHeader
headText={"Diary"}
leftChild={
<MyButton text={"왼쪽 버튼"} onClick={() => alert("왼쪽 클릭")} />
}
rightChild={
<MyButton
text={"오른쪽 버튼"}
onClick={() => alert("오른쪽 클릭")}
/>
}
/>
프로젝트 기초공사2
  const onCreate = (date, content, emotion) => {
    dispatch({
      type: "CREATE",
      data: {
        id: dataId.current,
        date: new moment(date).format("YYYY-MM-DDTHH:mm"),
        content,
        emotion,
      },
    });
    dataId.current++;
  };

  const onRemove = (targetId) => {
    dispatch({ type: "REMOVE", targetId });
  };

  const onEdit = (targetId, date, content, emotion) => {
    dispatch({
      type: "EDIT",
      data: {
        id: targetId,
        date: new moment(date).format("YYYY-MM-DDTHH:mm"),
        content,
        emotion,
      },
    });
  };
'FRONTEND > React' 카테고리의 다른 글
| [ 인프런 - 한입 크기로 잘라 먹는 React] 3. React 실전 프로젝트 - 감정 일기장 만들기(3) (0) | 2023.01.10 |
|---|---|
| [ 인프런 - 한입 크기로 잘라 먹는 React] 3. React 실전 프로젝트 - 감정 일기장 만들기(2) (0) | 2023.01.09 |
| [ 인프런 - 한입 크기로 잘라 먹는 React] 2. React 기본 - 간단한 일기장 프로젝트 (2) (0) | 2023.01.06 |
| [ 인프런 - 한입 크기로 잘라 먹는 React] 2. React 기본 - 간단한 일기장 프로젝트 (1) (0) | 2023.01.03 |
| [ 인프런 - 한입 크기로 잘라 먹는 React ] 1. React 기초 (0) | 2022.12.30 |